In this post, I will give you the instruction to create a virtual machine – EC2 instance.
I created video on Youtube to make your more easier to follow, also for Windows Server. Check it out from below video:
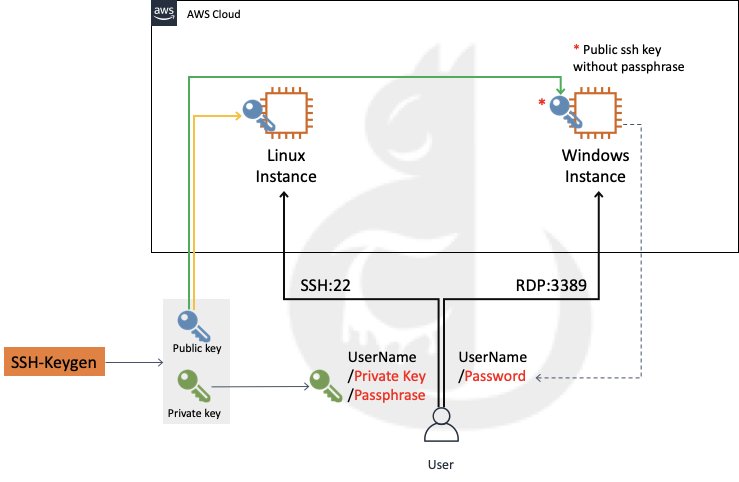
Firstly, I want to let you know about the working mechanism of RSA key when EC2 instance uses it to authenticate the incoming access request. They are SSH (for Linux OS) and RDP (for Windows OS).
As the below figure, it describes how to create and use keypair to authenticate when do remote access.
– With Linux virtual machine, the OS requires the remote access user must provide userName and private key (the private must pre-register with public key in the virtual machine). You must input your private key’s passphrase if you use passphrase during keypair creation.
– With Windows virtual machine, AWS wills auto generate password based on your public key during the instance launching. Be careful: your keypair must not include passphrase. After you get the userName and password from AWS Console Management, you can use that userName/password to do the remote access to the instance through RDP.
Step 1: Prepare keypair
Use ssh-keygen command (on Mac or Linux OS) to create keypair as below:ssh-keygen -t rsa -b 4096 -C "btuanexpress.net"
With option -C “btuanexpress.net”, you can add comment to keypair after the creation. You finish the creation following the question of command: “where to store your keypair”, “the passphrase for your keypair”.
If your local PC is running Windows, you can user puTTYgen to create the keypair. Look at this Link.
After that, you got 2 file: private key file and public key file.
***** Be Careful: DO NOT share your private key file with any other people or place it on somewhere that other people can access to that private key.
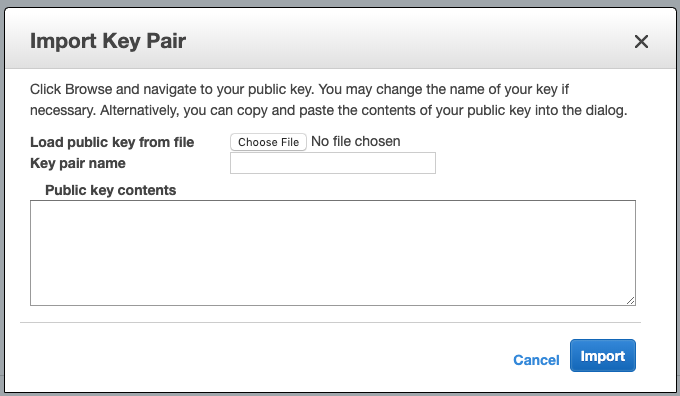
– Continuously, register your public keypair to AWS Keypair service:
After login to AWS console management, go to EC2 page > Key Pairs > click “Import Key Pair” and input the name, content of public keypair file.
Step 2: Launch Virtual machine – EC2 Instance
After the keypair preparation, now we go to next step: launch new EC2 instance.
Go to EC2 page > Instances > click “Launch Instance”. We have many steps to setting your EC2 instance look like:
– Select AWS Virtual Image (AMI): You can choose many OS: Linux, Ubuntu, Windows Server,… I select Amazon Linux OS – the Linux OS that AWS was modified to support the requirement of AWS.
– Select Instance Specification: mostly about the vCPU and RAM for your instance. I choose t2.micro type for the best costing (with newly AWS account, you can get free 750h/month with this instance type).
– Select network: If you read this post, I think your have less experience so for this screen, I recommend to use the default setting. You will get more control after you know deeply about AWS VPC. There are 2 point you should take a look: “Auto-assign Public IP“, select to let AWS auto assign public IP for your instance. And another one is “Advanced Details“, this is the place to config EC2 User-Data, at this time, just ignore it. If you want to know what is EC2 User-data, go here.
– Select Storage: Where to define the storage for your instance. I use default setting.
– Define tags: This screen is used to tag your instance. I just leave it none.
– Select Security-Group: choose “Select an existing security group” to use the existing default VPC security group
– The last screen is to review the configuration, if OK, click “Launch”. AWS will requests you to select the kaypair for EC2 instance. You select the keypair of the Step 1: keypair Preparation.
Get back to the Instance page, you can see the newly instance is creating. Just wait around 1 minute for the creation.
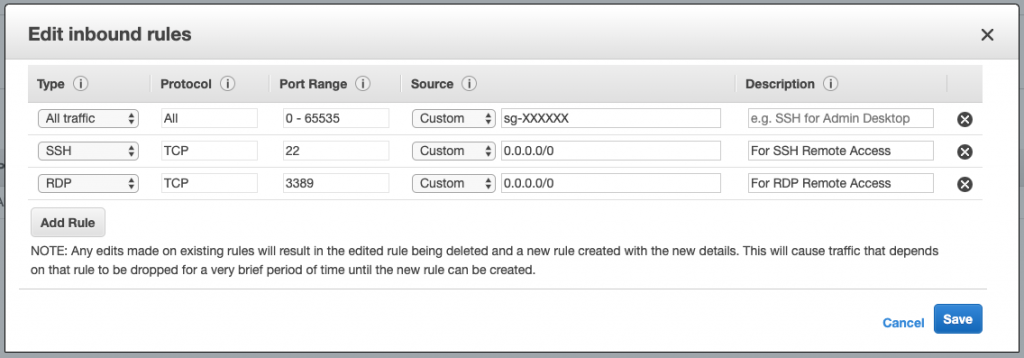
Step 3: Update inbound setting of Default Security Group
At the previous screen “Select Security-Group“, we used default security-group, so we need to update the inbound of security group to allow you do the remote access from your local PC.
Go to EC2 page> Security Groups > click to select the default VPC security group, look at the Inbound tab, select Edit and add new SSH:22 ad the below screenshot:
Step 4: Do Remote Access Into virtual machine – EC2 instance
Using SSH and private key from your local PC to do the remote access.
Firstly, we need to get the Public IP of EC2 Instances: select instance > Description > copy IPv4 Public IP address.
– With PC MAC or Linux OS: using ssh command as below:ssh -i btuanexpress ec2-user@IPv4_PUBLIC_IP
The btuanexpress is the file path to private key file, ec2-user is default userName userName that AWS defined for Amazon Linux OS. Note, If you use different AWS image (AMI), the userName can be difference. e.g. ubuntu, admin, root,…
Input passphrase (if needed).
After that, you will get in EC2 instance with remote access via protocol SSH, port 22.
– With PC Windows OS: You can use Putty. You can check app from here.
Finally, now you know how to create an EC2 instance and access into it with RSA keypair. Is it easy?
Go to My Youtube Channel to get more helpful videos.
Do not forget to like and subscribe my channel if you feel it good for you.
Happy Learning!